Serverless Applications, continuous delivery with AWS Lambda and API Gateway — Part 3, Managing API Gateway
Previously on “Serverless Applications”
In this series’ previous parts (part 1, part 2), we discussed how we test and deploy Lambda functions as a part of the CI/CD pipeline for our serverless configuration microservice. Today, we will discuss the missing link between our code and the internet, API Gateway.
As we learned, Lambda functions are a really useful way to run our code without having to worry about the infrastructure need to actually make it happen. But if we want our code to respond to HTTP requests coming in from the web, we need to have something always up and listening for network connections, ready to invoke our functions as needed. We could, for example, write a webserver to listen to requests and invoke the functions as they are called. We would then have to deploy this server on some machines in the cloud behind a load balancer. That would work, but then it wouldn’t be so “serverless” from our point of view, would it? The whole appeal of using Lambda functions is not to have to worry about servers!
 Okay, it’s not really “serverless”, we get it
Enter, API Gateway
Well, thankfully, Lambda functions have a cool cousin to help us with just that - API Gateway. According to AWS, API Gateway is a “fully managed service that makes it easy for developers to create, publish, maintain, monitor, and secure APIs at any scale.” Basically, API Gateway is a managed webserver, which, amongst many other features, holds a map between paths and endpoints (which are most commonly, Lambda functions). For example, a Gateway’s configuration might state that the path “/user” is mapped to the Lambda function “getUser”, and so, whenever a client requests the “/user” path, the getUser Lambda function will be invoked and the value returned from our function will be sent back to the client via HTTP.

But how do we manage this beast in production environments? Surely not by fooling around with the UI! The API Gateway UI is a good way to explore different configuration options, but managing our API with it can be very cumbersome and error prone. For each endpoint we publish we have a few dozen configurations we can make. Let me tell you from personal experience, it’s very easy to make mistakes if you have to do this each time you publish a new endpoint
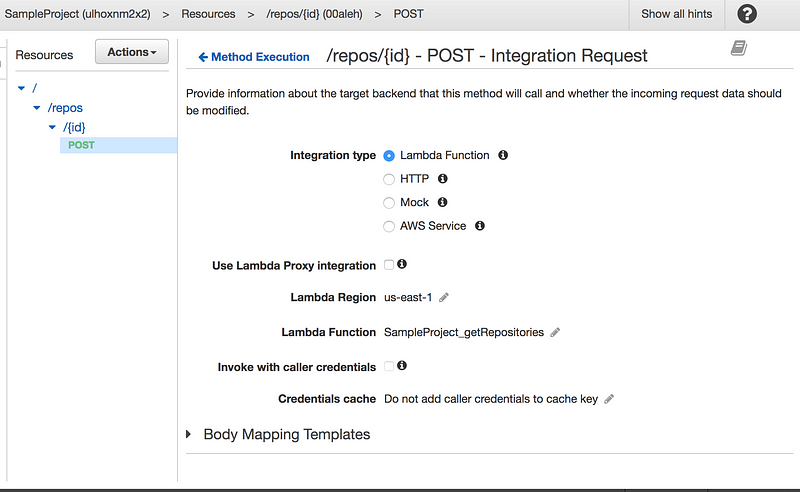 The API Gateway UI is not so fun to work with!
Infrastructure *is* Code
When we write a traditional web app, the route table is usually described in code. Take the “hello world” example from the Express.js website:
//  Source: express.js website: https://expressjs.com/en/guide/routing.html
var express = require('express')
var app = express()

// respond with "hello world" when a GET request is made to the homepage
app.get('/', function (req, res) {
  res.send('hello world')
})


See that on lines 6–8? The relation between the path “/” and the code which handles it is super clear. With API Gateway + Lambda acting as our webserver, we lose that clarity (and perhaps gain a new kind of “decoupled-ness” — depending on how you look at it). If we use the UI to configure our gateway, we can actually have \*no code at all\* describing the current version of our app. That’s not a good idea. All changes to our application should be described in code, this way we can manage versions, track changes and most importantly deploy automatically.

The idea of “[Infrastructure as Code](https://en.wikipedia.org/wiki/Infrastructure_as_Code)” has been around for a while: developers are advised to keep their deployment scripts, terraform files, and CI/CD YAML files as a part of their projects’ versioned source code repository. This becomes even more important with serverless architecture: the configuration of your infrastructure is an integral part of the feature you are working on. Configuring a new API Gateway endpoint is equivalent to adding a new route to your express app. You wouldn’t dare doing that outside of your codebase, would you?

#### Extending Apex

Once we realized that managing API Gateway from the UI was a bad idea, we started considering our options. We were already using [apex(1)](http://apex.run) for deploying Lambda functions, so all of our functions were already being described in JSON files. We didn’t want to create more configuration files in our project (we already had a JSON file per function) so we decided to add more attributes to the existing files, which would describe how each function should be wired to the API Gateway. This would look something like this:

```json
{
  "description": "search for github repos",
  "x-api-gateway": {
    "method": "post",
    "path": "/repos/{id}",
    "parameters":[
      {
        // configuration of input params. Skipped for brevity
        // check out a real example: https://github.com/rotemtam/serverless-ci-example/blob/master/src/functions/getRepositories/function.json
      }
  }
}
Controlling API Gateway using Swagger
One of the great features of API Gateway is that it supports Swagger as a format to describe APIs in code. This means that if we can generate a swagger file from our apex JSON files, which properly describes our desired configuration, we can update the Gateway during each deployment to match our current version of the code.
To accommodate all the different configuration possibilities, the folks on the API Gateway team created their own extension of Swagger, which adds, for example, the ability to configure the relationship between an API Gateway endpoint (path) and a Lambda function. The documentation for this feature isn’t great, so the easiest way (for us) to get started with this process was to create an initial version of what we wanted using the UI, export it as a JSON file, and use it as a baseline for our work. An API Gateway endpoint connected to a Lambda function when exported as a Swagger extension will look something like this:
{
  "swagger": "2.0",
  "info": {
    "version": "2017-02-26T12:58:40Z",
    "title": "SampleProject"
  },
  "host": "<host_id>.execute-api.us-east-1.amazonaws.com",
  "basePath": "/dev",
  "schemes": [
    "https"
  ],
  "paths": {
    "/repos/{id}": {
      "post": {
       // .. skipping some attributes for brevity
        "x-amazon-apigateway-integration": {
          // .. skipping more attributes for brevity
          "credentials": "arn:aws:iam::<account number>:role/APIGatewayLambdaInvokeRole",
          "requestTemplates": {
            "application/json": "{\n   \"method\": \"$context.httpMethod\",\n   \"body\" : $input.json('$'),\n   \"headers\": {\n     #foreach($param in $input.params().header.keySet())\n     \"$param\": \"$util.escapeJavaScript($input.params().header.get($param))\" #if($foreach.hasNext),#end\n \n     #end\n   },\n   \"queryParams\": {\n     #foreach($param in $input.params().querystring.keySet())\n     \"$param\": \"$util.escapeJavaScript($input.params().querystring.get($param))\" #if($foreach.hasNext),#end\n \n     #end\n   },\n   \"pathParams\": {\n     #foreach($param in $input.params().path.keySet())\n     \"$param\": \"$util.escapeJavaScript($input.params().path.get($param))\" #if($foreach.hasNext),#end\n \n     #end\n   },\n   \"context\" : {\n      \"gateway-request-id\" : \"$context.requestId\"\n   }\n}"
          },
          "uri": "arn:aws:apigateway:us-east-1:lambda:path/2015-03-31/functions/arn:aws:lambda:us-east-1:<account>:function:SampleProject_getRepositories/invocations",
          "httpMethod": "POST",
          "type": "aws"
        }
      }
    }
  }
}
As you can see from the example, each endpoint contains information about how it’s integrated with a Lambda function: which IAM Role will the API Gateway will use to invoke the function (the “credentials” attribute), which function to invoke (“uri”), and how to map the input from the HTTP Request into the Lambda function event (“requestTemplates”).
Our deployment script
Once we knew the structure of the file we had to produce, we wrote a script (in Python, but there’s a port to Javascript) that updates our API Gateway configuration as a part of our CI/CD process. On a high-level, this is what the script does:
- Traverses our project to find all relevant apex configuration files
- Compiles an API Gateway compatible Swagger file describing our desired API
- Makes a “PUT Rest API” call to the API Gateway Service, uploading the new swagger file
- Makes a “Create Deployment” call to the API Gateway Service. This actually tells the service to update our paths in production
The final step to achieving CI/CD bliss for our serverless app is to wire this into our deployment script. All we do is add this line to the script:
python infra/api-gateway-deployer/src/__init__.py src/project.json
Now, whenever we push a commit to our staging branch, this is what happens:
- All unit tests run (using mock-lambda-context)
- If they pass, we use apex(1) to deploy new versions of the functions to lambda
- Our API Gateway deployment script runs, constructing a Swagger file which describes our desired configuration and updates the Gateway
- (We run a suite of integration tests against the API Gateway, which we didn’t cover in this article)
- We’re done!
Wrapping Up
- In the previous parts of this series, we discussed how to setup unit-tests for Lambda functions and how to create an automated workflow for deploying Lambda functions to production environments.
- In this post we discussed how API Gateway integrates with Lambda to enable a truly serverless stack for building webservers. We learned about a strategy that we developed at AtomData to describe our Gateway in code. Finally, we showed how we use that strategy to update our API Gateway configuration automatically during deployment.
- Well, that’s all folks! We’ve covered some mileage here, showing how we achieved a fully automated deployment process for our serverless app. There’s a lot more to discuss, and I hope we can get to that in future posts!
—
Grab a full example of the solution described in this series on GitHub.