Build a “Kahoot!” Clone with AngularJS and Firebase
Demo: https://kahootclone.firebaseapp.com
GitHub repo: https://github.com/rotemtam/kahootClone
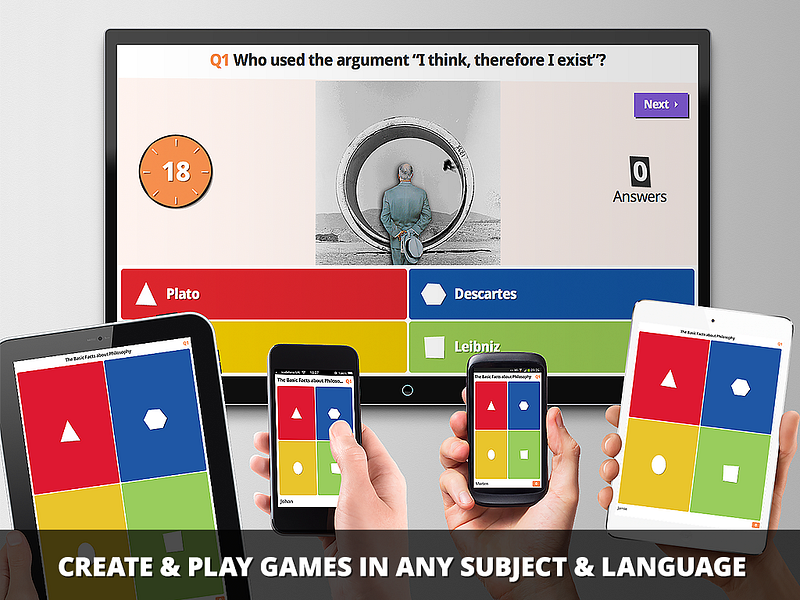
A little while back I wrote a story on Medium about why local-multiplayer games should be the future of gaming. An interesting (and successful) example of such a game is “Kahoot!”, a multiplayer trivia game designed to help teachers add some digital interactive fun to their classes. Questions are shown on a central screen (via projector) and students join in with their smartphones in order to answer them. Points and leaderboards are added, of course, for extra motivation.
Kahoot! is a good example of how the widespread availability of smartphones and tablets can be used to create new kinds of positive interactions between people.
In this article, I will show you how to build a little Kahoot! clone of your own, using a great new service called Firebase (not so long ago acquired by Google). Firebase makes it (very) easy to build real-time apps and as such is a perfect tool for the job. Maintaining synchronous state between devices can be a real pain in the ass, Firebase makes this almost free. We will be using AngularJS to build the frontend.
For the purpose of brevity, we will not go step by step into building the entire project, instead I will try to explain the more interesting points and you can see the rest in the project’s GitHub repo.
The Plan
First of all, if you haven’t played at least one round of Kahoot, you should do that now, you’ll have a hard time following otherwise.
Now let’s talk a little about our plan. Our app will be made of two main views:
- The “Host” View— This is the main screen where all players are looking out throughout the game. It could be viewed on a laptop, but ideally groups playing our game will be using a projector to project it on the wall.
- The “Player” View — this is what each individual player sees on their private device. Initially, players will have to type in a URL to get to the app and type in a shared PIN code which identifies the game session.
A game session will be roughly built of these states:
- Waiting for players — players are setting up and joining the game using the Player view. On the Host view, we display each player that has joined the game.
- Pre-question — before we show a question we will have a countdown to let players know they should focus and get ready.
- Question — We show on the Host view a question and four possible answers. On the Player view, we show a “Remote Control” kind of interface which allows players to send their answers before time runs out.
- Post Question — On the Host view, we show the correct answer and the names of the users that got it right. On the Player view, we give each player feedback whether they were right or wrong.
- Leaderboard — On the Host view, we show the sum of all players’ points so far.
Before we begin, let’s talk about our data model for a second. One of Firebase’s interesting features is that it is completely schemaless. This basically means that you can think of your Firebase database is one huge JSON object. You can have clients listening for (or writing) changes in any portion of this object. If you want to learn more about structuring data in Firebase, read this.
The fact that Firebase is schemaless doesn’t mean we don’t need to plan our data structure in advance. This is how we will store the data for our little app:
Pre-setup: Sign up to Firebase and get Yeoman+Angularfire
If you don’t already have an account there go ahead and open a Firebase account (it’s free).
In order to speed up our development, we will use the awesome Yeoman to scaffold our app. Luckily the guys at Firebase built a generator that will have us up and running in a couple of minutes. If you need help setting up read this quick intro by Mark Shust.
Setup:
Scaffolding our app
Let’s use generator-angularfire to create a new app, let’s call it kahootClone:
Follow through all the steps, you can skip installing identity providers as we won’t be using them.
Setting up Underscore.js with Angular
I love underscore.js. If you haven’t heard about it, it’s a tiny helper library (5.7kb) that helps you achieve amazing functional programming feats with great ease and efficiency. Here’s how to set it up properly for use with Angular’s Dependency Injection system:
Use bower to install underscore and yeoman’s wiredep config will inject it automagically into your index.html:
bower install --save underscore
Now, edit scripts/app.js, to declare a module called “underscore” and have your app depend on it, like this:
var underscore = angular.module('underscore', []);
underscore.factory('_', ['$window', function($window) {
  return $window._; // assumes underscore has already been loaded on the page
}]);

angular.module('kahootCloneApp', [
    'ngAnimate',
    'ngCookies',
    'ngResource',
    'ngRoute',
    'ngSanitize',
    'ngTouch',
    'firebase',
    'firebase.utils',
    'simpleLogin',
    'underscore'
  ]);
Managing game sessions and connections
The essence of creating a multiplayer game is having some shared state shared between all players. Like with card games, many of the game’s mechanics are determined by what is publicly known and what is privately known to a specific player, but it does not change the fact that most of the host’s responsibility is facilitating the flow of information from players the game state.
What we’re doing here, as we’ve begun to describe in our discussion above, is essentially creating a central game object on Firebase and having clients sync with it. Changes in the game’s central state will be dictated by our Host and minor changes, such as answering a question will be the Players’ responsibility. In order to facilitate this we create two AngularJS services that will be in charge of this:
angular.module('kahootCloneApp')
  .service('Host', function (fbutil, Trivia) {
    var self = this, _so;

    self.init = function(PIN) {
    	self.syncObject = fbutil.syncObject('games/' + PIN);
    	_so = self.syncObject;
    	return self.syncObject.$loaded();
    };

    self.setupGame = function() {
    	if(! _so.data.hasOwnProperty('questions')) {
    		_so.data.questions = Trivia.getQuestions();
    		_so.data.currentQuestion = 0;
    	}
    	return _so.$save();
    };

    self.getCurrentQuestion = function() {
        return _so.data.questions[_so.data.currentQuestion];
    };

    self.setGameState = function(state) {
        _so.data.state = state;
        return _so.$save();
    };

    self.nextQuestion = function() {
        _so.data.state = 'preQuestion';
        _so.data.currentQuestion++;
        return _so.$save();
    }

  });
The Host service is in charge of initializing a new game session using the init() method, as well as controlling the game’s state, along other things. Let’s review the Player service:
angular.module('kahootCloneApp')
  .service('Player', function (fbutil, _, $cookieStore) {
    // AngularJS will instantiate a singleton by calling "new" on this function
    var self = this, _so;

    self.getUniqId = function() {
    	// generate a unique idenftifier for the player and save it in a cookie to allow refreshes
    	if($cookieStore.get('playerId')) {
    		return self._id = $cookieStore.get('playerId');
    	} else {
    		$cookieStore.put('playerId', _.random(0,999999999)) ;
    		return self._id = $cookieStore.get('playerId');
    	}
    };

    self._connect = function() {
    	// common function between self.join, and self.init
    	// creates a connection to firebase backend
		self.syncObject = fbutil.syncObject('games/' + self.PIN);
    	_so = self.syncObject;
    	return _so.$loaded()
    }

    self.join = function(PIN, screenName) {
    	// register this user to a specific game (identified by PIN)
    	self.PIN = PIN;
    	self.screenName = screenName;
    	return self._connect(PIN)
    	.then(function() {
            // if a /users  node doesn't exist yet, create it
    		if(! _so.data.hasOwnProperty('users')) {
    			_so.data.users = {};
    		}

            // register this players info on the /users node
            // so host and other players are aware of them
    		_so.data.users[self.getUniqId()] = {
    			screen_name : screenName
    		};
    		return _so.$save();
    	});

    };

    self.init = function(PIN) {
        // get unique id from cookie store and connect to backend
		self.getUniqId();
		self.PIN = PIN;
		return self._connect()
    };

    self.saveSelfAttr = function(attr, val) {
        _so.data.users[self._id][attr] = val;
        return _so.$save();
    }

  });
The player service is in charge of creating the Player’s identity and persisting it through cookies via the getUniqId() method, connecting the Player to the game state via the _connect() method, as well as managing the Player’s attributes with the saveSelfAttr() method.
Setting up the Host View
Next, we look at the Host view. Start by using Yeoman to scaffold a new route. With this convenient feature of this generator, you can create a new route on app.js, a new controller, and a new HTML view file, all in one command. While we’re at it, we will also create an Angular service called “Host” which we will later use to build all the backend-facing functionality.
yo angularfire:route Host
yo angularfire:service Host
This is what the host view template looks like schematically (full file):
<div class="row" ng-if="game.data.state == 'waitingForPlayers'">
	...
</div>

<div class="row" ng-if="game.data.state == 'preQuestion'">
	...
</div>

<div class="row" ng-if="game.data.state == 'question'">
	...
</div>

<div class="row" ng-if="game.data.state == 'postQuestion'">
	...
</div>

<div class="row" ng-if="game.data.state == 'leaderboard'">
	...
</div>
As we discussed above in our discussion of this project’s data-model, each game session will have an attribute called “data.state” which will represent the current phase of this game session. When this game state is changed, changes will be reflected to both the Host View and the Player view of any participating player.
We keep our scope bound to Firebase using a feature of angularfire called “three-way-binding”, and we use our Host service to change the state when it is required.
Aside from updating the view, when have to take some action when states change, for example, checking players’ answers when we move from the “question” state to the “postQuestion” state. We do this by using Angular’s $scope.$watch function to listen to changes to the game-state:
$scope.$watch('game.data.state', function(newValue, oldValue) {

    switch(newValue) {

      case 'preQuestion':
        $scope.countdown = 5;
        $interval(function() {
          $scope.countdown--;
        },1000, $scope.countdown)
        .then(function() {
          Host.setGameState('question');
        });
        break;

      case 'question':
        $scope.currentQuestion = Host.getCurrentQuestion();
        $scope.answers = Trivia.getPossibleAnswers($scope.currentQuestion);
        $scope.game.data.possibleAnswers = $scope.answers;
        $scope.countdown = 7;
        $interval(function() {
          $scope.countdown--;
        },1000, $scope.countdown)
        .then(function() {
          Host.setGameState('postQuestion');
        });
        break;

      case 'postQuestion':
        $scope.correct = [];
        $scope.currentQuestion = Host.getCurrentQuestion();
        angular.forEach($scope.game.data.users, function(v,k) {

          if(Trivia.checkAnswer(Host.getCurrentQuestion().q, v.answer)) {
            v.currentPoints = (v.currentPoints || 0) + 100;
            $scope.correct.push(v.screen_name);
          }
        });
        Host.syncObject.$save();
        break;

      case 'leaderboard':
        $scope.leaderboard = _.map($scope.game.data.users, function(user) {
          return {
            screen_name:user.screen_name,
            current_points:user.currentPoints
          }
        });
    }

  })
});
The Player view and the leaderboards are pretty straightforward, so we won’t get into them today.
Deploying our game to the Firebase CDN
One nice feature of Firebase is that they offer you a free CDN to host static files. This way, theoretically, you might not need a server at all, for your next project. I feel that this is still far from the case, perhaps if Firebase includes the ability to store code on the cloud like Parse (a sort-of competitor) does very well, you could really go server-free for some use cases. Anyways, for our project, hosting our AngularJS app for free is pretty sweet, so let’s do it!
First of all, we need to make a build version of our site, we can’t just go live with our development version. Our awesome yeoman generator has included a useful Grunt command to help us out: “grunt build”. This small command does a lot of stuff, like minifying our code, compressing images and much more. At the end of the process, you will find your project ready for deployment at the “dist/” directory of your project.
After that, we need to download Firebase’s command line tools, which come packaged as a node package, which we can get easily using npm. Afterwards, all we need to do is initialize our Firebase app from the command line tool:
grunt build

npm install -g firebase-tools

firebase init
One last thing before we hit “deploy”, make sure that your firebase.json conf knows your public files are located in your “dist/” folder:
{
  "firebase": "kahootclone",
  "public": "dist/",
  "ignore": [
    "firebase.json",
    "**/.*",
    "**/node_modules/**"
  ]
}
That’s it, all is set! Hit “firebase deploy”, and get ready to play some multiplayer trivia!